last update january 16, 1999
This project describes a 23cm Wide-Band FM data-transceiver intended for high-speed packet-radio. It is currently used at the 38k4 LAP's at PI1RNI in Utrecht (JO22NB), PI1HVS in Hilversum (JO22OF) and at the BBS PI8GCB in Bussum (JO22OG). Also at other nodes in PA this transceiver might be used in the near future. Antennas used are the panel antenne published in CQ-TV 182 by G8GML, which is working very well at PI1RNI. At PI8GCB we use an "8" (quad hybrid), which does however not perform very well. At PI1HVS a slot antenna is used. All are horizontally polarized.
This data-transceiver is build on one eurocard size doublesided pcb, one side etched and the other side left all copper. It is meant to be used split-frequency with an offset of 54 MHz. This fits nicely in the bandplan at PA where high-speed digital experiments are allowed at 1241.XXX and 1295.XXX. It is however possible to work simplex but the PLL has to be reprogrammed every time one switches over from TX to RX or visa versa. Also it is possible to change the 54 MHz IF to another frequency between ~40 and ~70 MHz.
This article is referring to version 2.3 of the design and the pcb. The software in the Atmel is version 3.0.
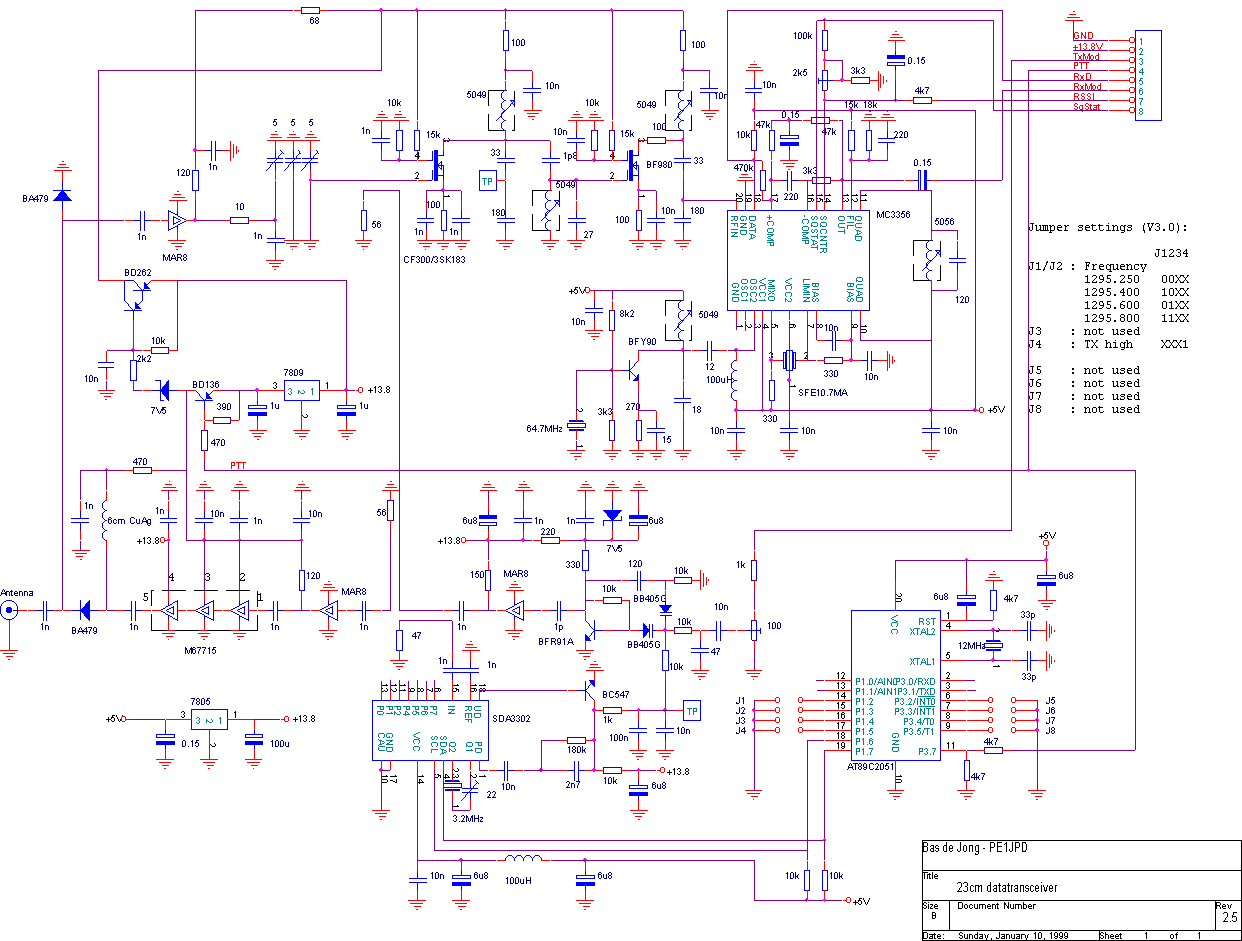
In 23schema.gif the schematic diagram is shown (Orcad Capture for Windows V7.00). The central part is a VCO around a BFR91A, oscillating directly on the TX-frequency. The IF is chosen to be 54 MHz, which happens to be equal to the shift between TX- and RX-frequency. So there is no need to reprogram the PLL when switching over from RX to TX and visa-versa. Currently the users transmit at 1241.XXX and receive on 1295.250, where the node transmits. So, for the user the PLL is programmed to i.e. 1241.250, and for the node the PLL locks on 1295.250. Of course, it is possible to reprogram the PLL every time when switching over, but this takes time...
The PLL is a SDA3302 which is used in TV-tuners. Interfacing to the Atmel 89C2051, a member of the large 8051-family, takes place via I2C. The loop-filter is build around the NPN-transistor and 2 C's and a R and is optimised for quick response with beta ~ 1.
The output of the VCO is buffered/amplified by a mar-8 and than fed to the PLL, the receiver-mixer and the transmit-path. Coupling to the RX and TX-parts is achieved by coupled striplines. Transmitting is very simple: the power is applied to a TX-buffer/amplifier consisting of a mar-8 giving 10 mW which then is amplified by the final amplifier to 2-3 Watts (Mitshubishi module). In version 2.5 is the coupling to the PLL achieved using a microstrip coupler in stead of directly via a capacitor.
The receiver-chain starts with a mar-8 used as preamp, having a gain of about 20 dB and a noisefigure of around 3.5 dB. After passing through a striplinefilter the 23-signal is fed to the mixer consisting of a GaAs-fet (3SK183, CF300, 3SK97 or equivalent). The first IF is as already mentioned 54 MHz. This signal is first filtered and than amplified by a BF980 dual-gate mosfet. The IF processing further takes place in a MC3356. Using an external crystal-oscillator on 64.7 MHz the IF signal is mixed to 10.7 MHz, filtered in a Murata broadband filter (I use 280 kHz, but depending on the baudrate a narrower filter can be used). Finally the 10.7 MHz is demodulated using a quadrature detector. During transmitting the power of the receiver-chain is switched off, exept the 5V of the MC3356.
The microcontroller 89C2051 has 2k flash rom on-chip, and 128 bytes ram. 2 ports (P1 and P3) are partially available. Although in this set-up the VCO is never reprogrammed, the PTT is also fed into the atmel and case be used by the software to change frequencies. Two sets of jumpers are placed on the print, of which one set is currently used for frequency-selection and high/low or low/high receiving and transmitting.
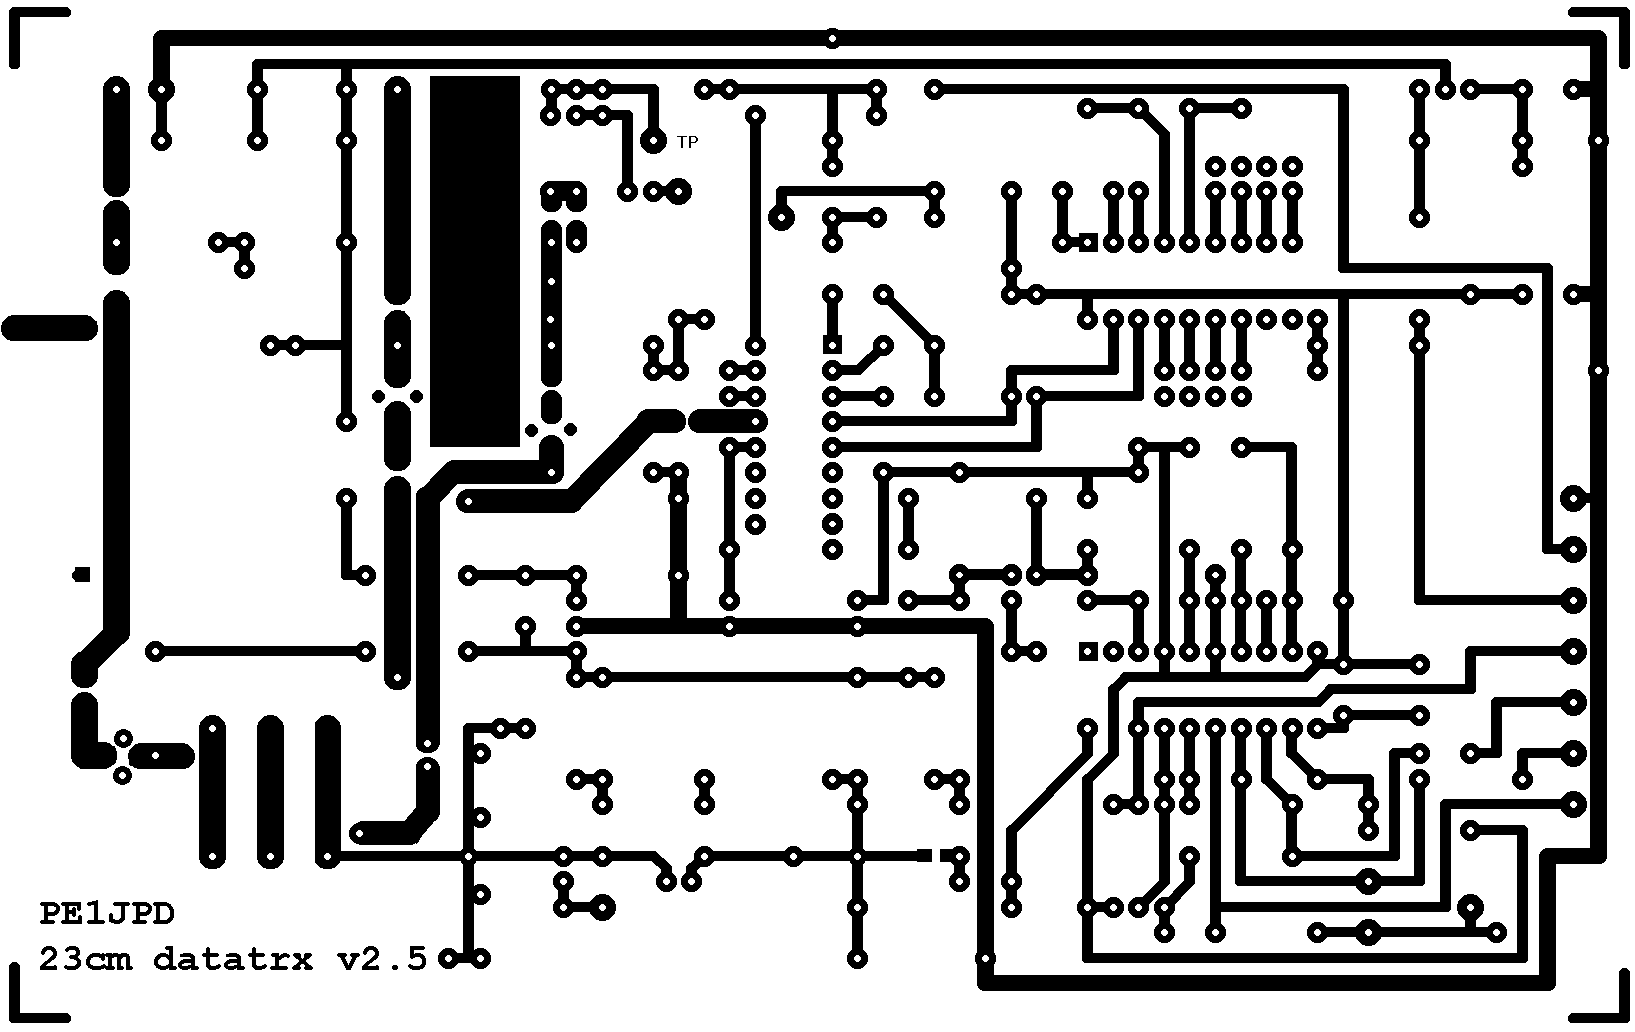
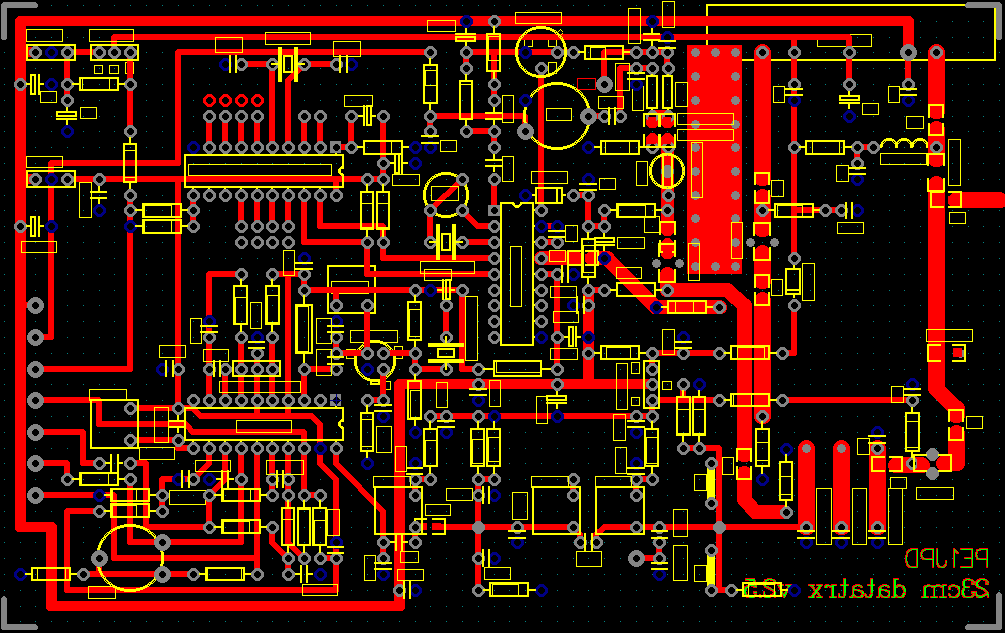
In 23pcb.gif the printed circuit board is shown. The pcb is designed with Protel for Windows V1.5. In 23parts.gif the componentlayout if shown (the componentvalues are not visible).
After drilling the holes in the pcb (0.7-0.8mm), remove the copper around the holes at the other side. Do not free the holes which are marked red in 23pcb.gif, since these are used to contact through to earth. Drill a hole of the right size on the spot for the BFR91A (5 mm), 3SK183 (3.5 mm) and the BF980 (5 mm). Then solder the pcb all around in a fitting tin box (I use standard size 16x10x3 cm with 2 lids). Take care that you position the pcb with the module-end in a bend corner and not a corner which has to be soldered. Of course, all holes in the tin box have to be drilled before the pcb is fit into it. All signals can be fed through 1 nF feedtrough C's apart from the 23cm signal. This is best led to the outer via a piece of PFTE-coax to the N-connector at the housing.
Use a short piece of wire cut of a resistor and fold it to a "U"-form to make an earth contact for the mar's. Put the "U" in from the copperside, solder it to earth and cut the edges at the other side down to ~1 mm and bend them away from the mar. By the way, leave the mar's out as long as possible, they can be destroyed by oscillations during tuning up. I use a socket only for the Atmel. Cut pin 10 of the socket short, place it in posistion and solder this pin to earth. (Use a pointed soldering iron for this). The earth-pins of the other IC's can be cut short also and directly soldered to earth.
The VCO gets some special attention. First, bend a small piece of copperfoil in an "U"-shape and shorten the earth-side of the pcb with the earthspot next to the VCO. It might be nessecary to file the hole a bit sqare at that side. Then put the transistor in. All leads have to be as short as possible, and do not use a lot of solder. The 120 pF capacitor from BB405 to collector serves as oscillating coil: leave the lead on one side approx. 1 cm, and the other end short. Solder the short end to the varicap (C flat on the pcb), and bend the other lead in an "L" shape and solder the end halfway between the BFR and the mar. The 1p C's I use are SMD-type, but this might not be nessecary, just cut the leads of standard small C's short and solder them in at the etched side.
The cans of the coils 5049 and 5056 (Neosid) and the houses of the crystals have to be soldered to earth.
Take care that the capacitors used are good at these high frequencies. Do NOT use 10 or 100nF surplus from computer boards or so!. This holds true for all 10 or 22nF C's all over the pcb, and specially at the RX-chain. Decoupling is the key to succes here.
The regulators do not need to be screwed to the box. They do not get hot, at least not when you use this transceiver for packet. This holds also for the module: beside the tin box itself no extra cooling is needed but of course doesn't harm.
The "6cm coil" in the schematic diagram is a length of 0.3 mm coated wire (yes, indeed, 6 cm long) which is wound on a 1.5 mm drill. It is then streched to fit at the proper place.
Of course a programed 89C2051 is needed before one can start tuning up the transceiver The assembler file is link30.asm (version 3.0). The assembler used is ASEM-51 V1.1, a family cross assembler running at the PC. The schematics and latest software release for the programmer can be found at http://sistudio.com .
First thing to do is to get the VCO oscillating at the proper frequency and get the PLL in lock. Only fit the mar-8 in the oscillator-buffer for this. It might take you some time to get the PLL in lock. When the control voltage keeps low (0V), it might help to put a resistor of 1 k between the base of the BC547 and +5V. (so between pen 18 and 14 of the SDA3302 at the printed side.) Try also shortening the "coil" formed by the 120pF capacitor. When nothing helps, remove all parts of the VCO, clean the pcb and start again.
First, tune the RX-chain. Start with the 64.7 MHz oscillator. When tuning the 5049 the oscillator abrubtly switches on and off. Check the output of the oscillator with an ordinary oscilloscoop at pen 3 of the MC3356. When removing the scoop, you might have to readjust a bit because of the influence of the scoop. Then set the 3 sky trimmers to minimum and feed 54 MHz (-30 dBm) into the antenna, or at the testpoint at the input of the IF-filter. Adjust the IF coils (5049) for maximum reading on the S-meter. Connect the scoop to the RxM output and adjust the IF quadrature detector (5056) for proper output. Better is to set the scoop to DC and measure at pin 13 of the MC3356 (direct output). Center the line or noise you see in the middle of the minimum and maximum detector output. When you don't see anything or strange "blobs" when tuning coils or touching parts in the RX-chain, something is oscillating. Try locate this first and solve this problem. Best is to use a (tunable) frequency generator at 54 MHz first and later at the Rx-frequency with output adjustable from -120 to 0 dBm.
When the IF works, adjust the stripline filter for maximum sensitivity at 23cm. The sky-trimmer the closest to the GaAs-fet is at minimum capacity, so this stripline is slightly too long. One can shorten it by 1 mm at the cold end, but this is not nessecary.
The transmitter should work immediatly. No tuning is required except for the deviation. Output of the module is ~2-3 Watts. At the input of the module ~10 mW is measured. The oscillator-buffer should do ~5 mW power.
A direct TCP/IP connection with 38k4 using JNOS gives a throughput of ~2.5 kByte/sec. On 76k8 this is around 3.5 kByte/sec.When working via PI1RNI, with two stations at 38k4, the throughput is 1.2-1.3 kByte/sec. The TxDelay is 10-15 ms.
The setup used is a standard PC (386, 486) with a SCC-card designed by PE1PET. Since no DMA is used on this card, the speed is limited to about 100 kbps I guess. The modem used up till now is a simple manchester modem designed by S53MV. In stead of the original design, a sampler is added which decreases the Bit Error Rate significantly (manmodnl.htm only in Dutch, sorry). Also, a 4th order lowpass is used between the transceiver and the modem (rxfilter.htm). This improves the signal-to-noise ratio by approx. 10 dB.
Up till now, about 20 to 30 transceivers are working correctly.
Special thanks to Hans, PE1CKK who helped a lot with the design, the prototypes and the tuning.